Basic suturing skills are one of the first hands-on competencies every medical, nursing, veterinary, and physician assistant student is expected to develop. This guide walks through the instruments you actually need, the suture materials that make sense for learners, the core techniques worth mastering first, and realistic ways to practice until your hands move with confidence.
Why Basic Suturing Skills Matter for Students
Suturing is more than closing skin. It teaches tissue handling, knot security, tension control, and sterile technique all at once.
Students who build these habits early tend to progress faster in surgical rotations, emergency departments, and simulation labs.
- You learn to respect tissue instead of crushing it.
- You develop consistent, reproducible hand movements.
- You understand wound healing well enough to choose the right closure.
- You reduce the risk of infection, dehiscence, and ugly scarring.
- You gain the confidence to assist rather than just observe.
None of this requires expensive equipment. It requires repetition, feedback, and attention to detail.
The Core Suturing Instruments You Need to Know
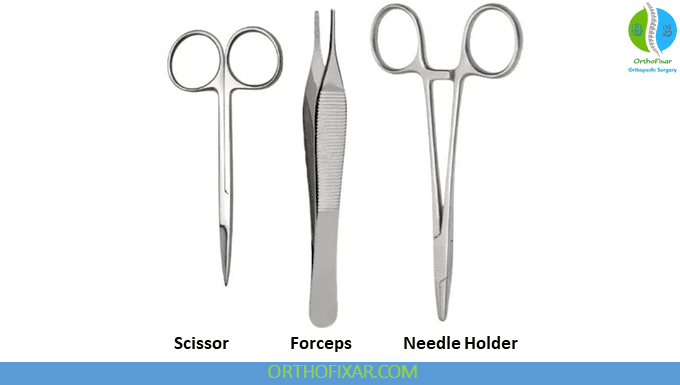
A standard suture tray is simple, but each tool has a specific job. Learning the names and purposes early saves you from awkward moments in the operating room.
Needle Holders
The needle holder is the instrument most students misuse at first. It grips the needle, drives it through tissue, and helps form knots.
- Choose a needle holder with a ratchet that locks smoothly, not one that snaps shut.
- Hold it with your thumb and ring finger, index finger resting along the top for control.
- Grip the needle at roughly two-thirds of its length from the tip, not at the very base.
- Use the same instrument for tying to keep your workflow efficient.
Forceps and Tissue Handling
Forceps come in toothed and non-toothed versions. Toothed forceps grip skin; non-toothed forceps handle delicate tissue such as bowel or vessels.
- Use forceps to stabilize tissue, not to crush it.
- Apply just enough pressure to hold the edge steady.
- Never use forceps as a substitute for retractors on thin skin.
- Keep the tips clean of dried blood for a reliable grip.
Scissors
Two types appear in most trays: suture scissors for cutting thread and Mayo or Metzenbaum scissors for tissue.
- Suture scissors have a notch or blunt tip to avoid cutting tissue accidentally.
- Mayo scissors are heavier and used for fascia and dense tissue.
- Metzenbaum scissors are finer and used for delicate dissection.
- Never cut suture with tissue scissors; it dulls the blades quickly.
Suture Trays and Organization
A tidy tray makes you faster and safer. Set up your field the same way every time.
- Place instruments in the order you will use them.
- Keep the suture packet within reach but off the sterile field until opened.
- Keep a small basin for saline or antiseptic solution.
- Dispose of sharps in a rigid container immediately after use.
Suture Materials and Needle Types
Suture selection depends on tissue type, tension, healing time, and cosmetic goals. Students should know the broad categories before memorizing brand names.
| Material | Type | Common Use | Notes for Students |
|---|---|---|---|
| Plain catgut | Absorbable | Mucosa, rapidly healing tissue | Short absorption; rarely first choice today |
| Polyglactin 910 | Absorbable | Subcutaneous tissue, fascia | Predictable absorption, good knot security |
| Poliglecaprone 25 | Absorbable | Subcuticular skin closure | Smooth passage, minimal reaction |
| Nylon | Non-absorbable | Skin, drains, retention sutures | Easy to handle, needs multiple knots |
| Polypropylene | Non-absorbable | Vascular anastomoses, skin | Low tissue drag, strong memory |
| Silk | Non-absorbable | Ligatures, drains, mucosal closure | Excellent knot security, higher infection risk |
Suture size follows a simple rule: the more zeros, the thinner the thread. A 4-0 suture is thicker than a 6-0 suture.
- Use thicker sutures for fascia and deep tissue under tension.
- Use finer sutures for face, hands, and pediatric skin.
- Choose cutting needles for tough skin and taper needles for soft tissue.
- Match needle curvature to the depth and location of the wound.
Good suturing is mostly good decision-making. The thread only carries out what you already decided.
Core Suturing Techniques Every Student Should Learn
You do not need twenty techniques to start. Master a handful and you can close most simple wounds safely.
Simple Interrupted Suture
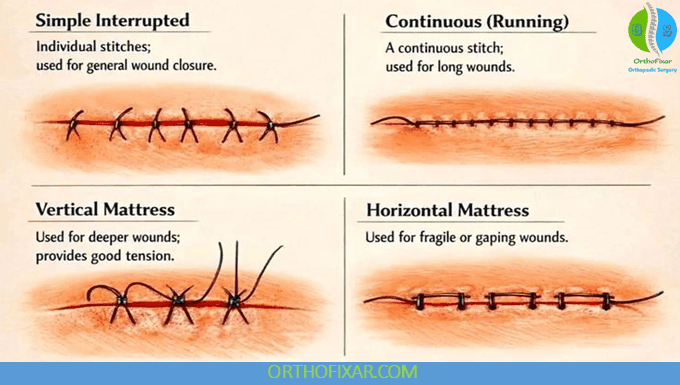
This is the foundation. Each stitch is placed and tied individually and is independent of the others.
- Enter and exit at equal distances from the wound edge.
- Keep bites perpendicular to the skin surface.
- Evert the wound edges slightly so they meet flat.
- Space sutures evenly to distribute tension.
Continuous (Running) Suture
A single thread runs along the wound and is tied only at the ends. It is fast and watertight but less forgiving if one loop fails.
- Best for long, low-tension wounds and mucosal closures.
- Maintain consistent tension along the entire line.
- Do not cinch so tightly that the skin puckers.
- Keep the final knot secure, because the whole line depends on it.
Mattress Sutures
Mattress sutures are useful when you need extra eversion or hemostasis.
- Vertical mattress sutures evert edges and relieve tension well.
- Horizontal mattress sutures compress tissue and control bleeding.
- Both can leave more scarring than simple sutures if used carelessly.
- Use them where tension is high, such as the back or scalp.
Subcuticular Suture
An absorbable running suture placed just below the skin gives a clean cosmetic result and requires no removal.
- Popular for facial and cosmetic closures.
- Requires careful depth control to avoid dimpling.
- Works best when deep dermal sutures already took the tension.
- Ask for supervision the first several times you attempt it.
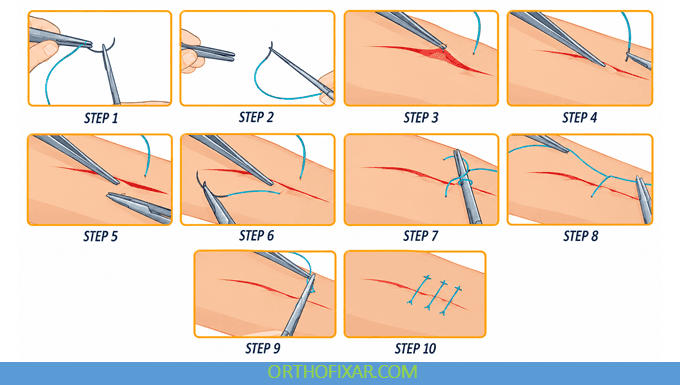
Step-by-Step: Placing a Simple Interrupted Suture
Practice this sequence until it becomes automatic. Slow and correct beats fast and sloppy.
- Confirm the wound is clean, irrigated, and free of foreign material.
- Anesthetize locally if needed and allow time for full effect.
- Hold the needle holder in your dominant hand and forceps in the other.
- Grip the needle two-thirds back from the tip.
- Drive the needle through the skin at a right angle, entering and exiting evenly.
- Release the needle, regrasp it on the far side, and pull the thread through.
- Leave a short tail and tie an instrument knot.
- Cut the ends, leaving enough length for easy removal later.
- Repeat, spacing sutures evenly along the wound.
- Inspect the closure, clean the area, and apply a suitable dressing.
Knot Tying: Instrument Tie and Hand Tie
Knots fail more often than sutures do. A loose knot is the same as no knot at all.
Instrument Tie
The instrument tie is faster and easier for most beginners.
- Wrap the thread around the needle holder once or twice for the first throw.
- Pull the short end through and tighten with a square motion.
- Alternate direction with each subsequent throw.
- Use at least three throws for most non-absorbable sutures.
Hand Tie
Hand tying is essential when instruments are awkward or when you are working in a deep field.
- Learn the two-hand tie before the one-hand tie.
- Keep consistent tension on both strands to avoid an air knot.
- Practice on a glove or foam pad until the motion is smooth.
- Confirm the knot is square, not a slipping granny knot.
If your knot can slide under light tension, it will slide inside a patient. Tighten it properly the first time.
Common Mistakes Students Make and How to Fix Them
Most beginner errors are predictable and fixable with small adjustments.
- Bites too far apart: aim for equal distance on both sides of the wound.
- Too much tension: let the tissue hold the wound, not the thread.
- Crushing tissue with forceps: grip gently and only when necessary.
- Inverted wound edges: add slight eversion as you tighten.
- Air knots: pull both ends firmly and evenly before the final throw.
- Inconsistent spacing: mark your planned entry points lightly first.
- Rushing: slow down until the motion is reliable, then build speed.
How to Practice Basic Suturing Skills Without a Patient
Simulation is where skill is built. You can train effectively at home or in a lab.
- Use a suture pad, pig skin, banana peel, or orange rind as a practice surface.
- Practice simple interrupted sutures until you place ten evenly spaced ones without hesitation.
- Move on to continuous sutures and mattress patterns once the basics feel natural.
- Time yourself occasionally, but prioritize accuracy over speed.
- Record short videos of your technique and review them for wasted motion.
- Ask a senior student or instructor to critique your knots and spacing.
- Vary materials so you feel the difference between absorbable and non-absorbable thread.
- Practice glove changes, sharps handling, and tray setup alongside suturing.
Building a Simple Practice Routine
Short, focused sessions beat long, unfocused ones.
- Ten minutes of knot tying before each practice session.
- Twenty sutures of one technique per session.
- One new technique introduced per week.
- One review session with feedback every week.
Wound Assessment and Infection Control Basics
Technique means nothing if the wound becomes infected. Sterile habits start before the first stitch.
- Wash your hands and wear appropriate gloves and eye protection.
- Clean and irrigate wounds thoroughly before closure.
- Use sterile drapes and instruments, and keep the field organized.
- Inspect for devitalized tissue, foreign bodies, and tension.
- Avoid closing wounds that should be left open to drain.
- Dispose of needles and blades in approved sharps containers only.
- Document wound size, location, technique, and materials used.
Students should also recognize when closure is not their job. Deep wounds, contaminated wounds, nerve or tendon involvement, and unstable patients all require senior input.
Conclusion
Basic suturing skills develop through deliberate practice, not talent. Learn your instruments, understand your materials, master a few reliable techniques, and tie every knot as if it matters, because it does. Practice under supervision, accept corrections, and keep your setup and safety habits consistent. Do that, and you will enter clinical settings already ahead of where most beginners start.
Frequently Asked Questions About Basic Suturing Skills
What are the most important basic suturing skills to learn first?
Start with instrument handling, a simple interrupted suture, and secure knot tying. These three skills appear in nearly every wound closure. Once they feel natural, add continuous and mattress sutures. Everything else builds on this foundation.
Which suture material is best for beginners?
A synthetic absorbable such as polyglactin 910 or a non-absorbable like nylon is good for practice because both handle predictably. Nylon teaches you knot security, while polyglactin shows how absorbable material behaves. Avoid starting with very fine 6-0 or 7-0 threads, since they are harder to control.
How many throws should a suture knot have?
For most non-absorbable sutures, three throws are sufficient. For slippery materials such as polypropylene or monofilament nylon, four throws may be safer. Absorbable braided sutures often hold well with two or three. Always confirm the knot is square and tight before cutting.
How long does it take to become competent at suturing?
With regular practice, most students can place a clean simple interrupted suture within several weeks of focused training. Broader competence, including knot reliability under tension and comfort with different materials, usually develops over months of practice and supervised clinical exposure.
Can I practice suturing on fruit or vegetables?
Yes, banana peels, orange rinds, and tomato skins are common beginner surfaces. They simulate thin skin reasonably well. Suture pads and pig skin offer more realistic tissue resistance once you are ready to progress. Combine these with knot tying practice on cord or thread.
What is the difference between an interrupted and a continuous suture?
Interrupted sutures are individual stitches tied separately, so a single failure does not open the whole wound. Continuous sutures use one thread along the wound line, making them faster and more watertight. Interrupted is generally preferred for high-tension or infected areas.
How tight should sutures be?
Just tight enough to bring the wound edges together without blanching the skin or puckering it. If the tissue turns pale or cuts through, you have tied too tightly. Tension should be distributed by deep sutures, not placed entirely on the skin layer.
When should a wound not be sutured closed?
Wounds that are heavily contaminated, older than the accepted closure window, infected, or involving deep structures may need to heal by secondary intention or delayed closure. Bite wounds, puncture wounds, and wounds with devitalized tissue often fall into this category. Always seek senior guidance.
Do I need to wear gloves when practicing on a simulator?
Yes. Gloves teach you to handle sutures with reduced tactile feedback, which mirrors real conditions. They also reinforce clean technique and sharps safety from the very beginning. Sterile gloves matter most when practicing full sterile setup.
What is the best way to remove sutures safely?
Clean the area, lift the knot slightly, and cut the thread on one side close to the skin so no contaminated segment is dragged through the wound. Remove every other suture first, check the wound edges hold, then remove the rest. Follow local protocol and timing guidelines for the wound site.