
Ultrasound is an essential diagnostic tool that every medical student should understand early in clinical training. This guide covers the core principles of ultrasound orientation, probe handling, and common artifacts you will encounter at the bedside. Mastering these basics will help you acquire quality images and avoid misinterpretation during your rotations.
Why Ultrasound Orientation Matters for Medical Students
Before you can interpret what you see on the screen, you must understand where the probe is in space and how it relates to the patient’s anatomy. Misorientation is one of the most frequent mistakes beginners make.
- Standard orientation: On most probes, a marker (dot, line, or light) corresponds to the left side of the screen.
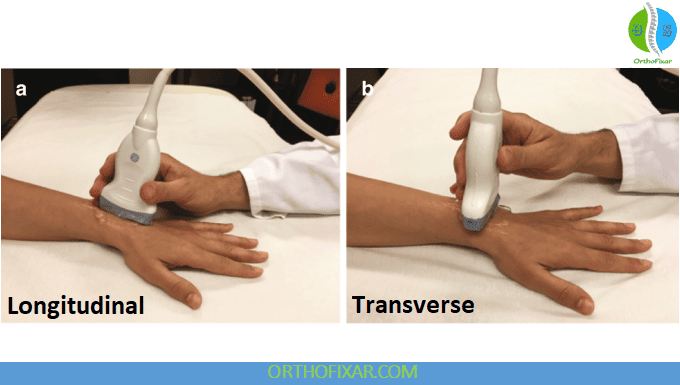
- Longitudinal vs. transverse: Rotating the probe 90 degrees changes your view from a sagittal to a cross-sectional plane.
- Probe indicator direction: Always point the marker toward the patient’s head (for longitudinal) or the patient’s right side (for transverse) in standard abdominal exams.
- Consistency is key: Develop a habit of checking the marker before every scan.
“Orientation is the language of ultrasound. If you get the indicator wrong, you are reading a map upside down.” – Dr. Rebecca Lim, Clinical Ultrasound Educator
Probe Selection and Grip Fundamentals
Different probes give different fields of view and depths. Using the wrong probe for a target organ leads to poor image quality and clinical errors.
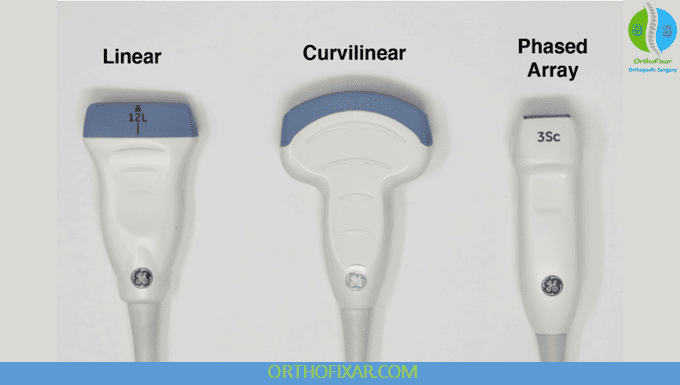
- Curvilinear (low frequency, 2–5 MHz): Best for deep abdominal organs like the liver, kidneys, and bladder.
- Linear (high frequency, 7–15 MHz): Ideal for superficial structures such as vessels, nerves, and soft tissue.
- Phased array (small footprint): Used for cardiac imaging and between ribs.
- Grip technique: Hold the probe like a pen, with your thumb on top and fingers wrapped around the sides. Keep your wrist relaxed to absorb movement.
- Use adequate gel: Air gaps block ultrasound waves completely.
Planes of Imaging: Understanding the Three Standard Views
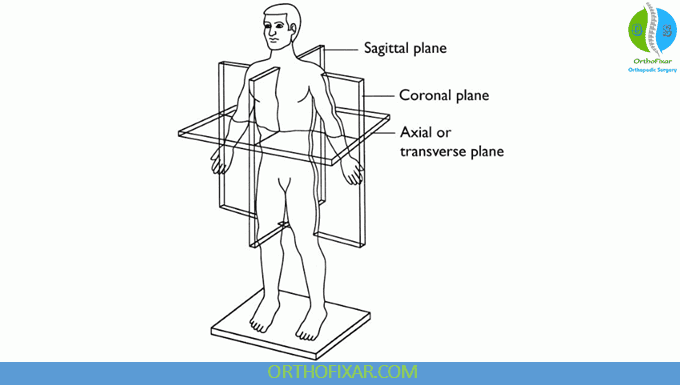
You will primarily use three imaging planes during your ultrasound exams. Knowing which plane you are in helps you reconstruct the three-dimensional anatomy in your mind.
- Sagittal (longitudinal) plane: Divides the body into left and right. Probe marker points toward the head.
- Transverse (axial) plane: Divides the body into top and bottom. Probe marker points toward the patient’s right side.
- Coronal plane: Divides the body into front and back. Used often for kidney and pleural views.
- Fanning and sliding: Small movements—fan the probe in the plane rather than sliding it across the skin for better target identification.
Common Ultrasound Artifacts You Will Encounter
Artifacts are not always errors—some help you identify structures. Recognizing them prevents misdiagnosis.
- Reverberation artifact: Parallel lines deep to a strong reflector (e.g., diaphragm or needle). Looks like a ladder.
- Acoustic shadowing: Dark area behind a dense structure like a gallstone or rib. Useful for identifying stones.
- Posterior acoustic enhancement: Bright area behind fluid-filled structures like the gallbladder or bladder. Helps confirm cysts.
- Mirror image artifact: A false duplicate of an organ appears on the other side of a strong reflector (common at the diaphragm).
- Side lobe artifact: False echoes appear lateral to the main beam, often from bowel gas or ribs.
- Comet tail artifact: Small, bright, tapering echoes distal to a metallic object or small calcification.
“An artifact is only a mistake if you don’t know it is there. Learn to use them as clues, not noise.” – Dr. James Carter, Emergency Ultrasound Specialist
How to Optimize Your Image Quality
Even with good orientation, a poorly adjusted machine will give unusable images. Here are the basic controls you need to master.
- Depth: Adjust so your target organ sits in the middle third of the screen.
- Gain: Overall brightness of the image. Too high makes the image washed out; too low hides anatomy.
- Time gain compensation (TGC): Sliders adjust brightness at specific depths to correct for tissue attenuation.
- Focus: Place the focal zone at the level of your target for best lateral resolution.
- Frequency: Most machines allow you to switch between penetration and resolution modes. Deeper targets need lower frequencies.
Step-by-Step: Scanning the Abdominal Aorta as a Practice Example
This common exam is excellent for practicing orientation and identifying artifacts. Follow these steps during your next simulation session.
- Place the curvilinear probe in the epigastrium, marker pointing toward the patient’s head (sagittal view).
- Identify the liver (homogeneous, mid-gray) and the aorta (anechoic tubular structure just left of midline).
- Rotate the probe 90 degrees for transverse view. The aorta appears as a round, dark circle anterior to the vertebral body.
- Look for acoustic shadowing from the vertebral body posteriorly.
- Slide the probe inferiorly to follow the aorta to the bifurcation. You will see the iliac arteries branch like a Y.
- Note: The inferior vena cava (IVC) lies to the patient’s right and is more compressible than the aorta.
Useful Table: Artifact Recognition at a Glance
| Artifact Name | Appearance | Common Location | Clinical Tip |
|---|---|---|---|
| Reverberation | Parallel lines | Diaphragm, pleural line | Indicates a strong reflector |
| Acoustic shadowing | Dark cone deep to structure | Gallstones, ribs, calcifications | Helps confirm stones |
| Posterior enhancement | Bright area deep to fluid | Gallbladder, bladder, cysts | Confirms fluid-filled structure |
| Mirror image | Duplicated organ on opposite side | Liver-lung interface | Do not mistake for mass |
| Comet tail | Small bright line tapering away | Near metal or microcalcifications | Common in B-lines (lung) |
| Side lobe | False echoes off to side | Bowel gas, rib edges | Change angle or move probe |
Tips for Avoiding Common Beginner Mistakes
Most errors in ultrasound come from rushing or forgetting basic physics. Keep these points in mind during every scan.
- Always check that the probe marker matches the screen indicator before starting.
- Use enough gel—dry scanning creates air pockets that block sound waves.
- Do not press too hard. Light pressure is usually sufficient; heavy pressure distorts anatomy.
- Move the patient or ask them to breathe if you cannot see the target. Deep inspiration pushes the liver and kidneys down.
- If the image is poor, adjust depth and gain before blaming the patient or equipment.
- Practice on healthy colleagues first to learn normal anatomy before looking for pathology.
Conclusion
Ultrasound is a skill that improves with deliberate practice and an understanding of orientation and artifacts. By mastering probe handling, recognizing common image distortions, and adjusting machine settings, you will build a strong foundation for your clinical years. Remember that every artifact tells a story—learn to read it, and you will avoid many diagnostic pitfalls.
Frequently Asked Questions
Why does my ultrasound image look all black when I start?
This usually means the probe is not making good contact with the skin. Apply more gel and ensure the probe face is flat against the skin. Also check that the depth and gain settings are appropriate for the target structure.
What does the marker on the ultrasound probe actually do?
The marker corresponds to the left side of the ultrasound screen. By convention, pointing the marker toward the patient’s head (in longitudinal view) or the patient’s right side (in transverse view) gives you standard anatomical orientation.
How do I tell the difference between a cyst and a solid mass?
A simple cyst appears black (anechoic) with posterior acoustic enhancement (bright area behind it). A solid mass usually has internal echoes and may show acoustic shadowing if it contains calcifications or stone material.
What is the most common artifact beginners confuse with pathology?
Reverberation artifact is often mistaken for a pleural effusion or fluid collection. Remember that reverberation lines are evenly spaced and parallel, while real fluid collections are anechoic with irregular borders.
Should I always use the highest frequency probe available?
No. Higher frequency gives better resolution but less penetration. Use a high-frequency linear probe for superficial structures (veins, nerves, thyroid) and a low-frequency curvilinear probe for deep abdominal and pelvic organs.
Why do I see a bright line at the bottom of the screen sometimes?
That is likely a reverberation artifact from a strong reflector like the diaphragm or pleural line. It is normal and does not indicate a problem with the machine or the patient.
What is the best way to practice orientation skills?
Use a gelatin-based ultrasound phantom or scan a willing volunteer. Start with the aorta and IVC in the abdomen—they are large, anechoic, and easy to find. Rotate the probe between longitudinal and transverse views repeatedly.
How do I avoid side lobe artifacts?
Side lobe artifacts happen when off-axis sound waves hit a strong reflector and return false echoes. To minimize them, adjust your probe angle slightly, move the probe to a different acoustic window, or reduce overall gain.
What does “gain” mean in ultrasound terminology?
Gain controls the overall amplification of returning echoes. It is like the brightness of the image. Turning gain too high makes the image look white and noisy; turning it too low makes it too dark to see structures.
Is it normal to see shadowing behind ribs during a cardiac ultrasound?
Yes. Ribs are dense bone that block ultrasound waves completely, creating an acoustic shadow. This is why cardiac ultrasound uses the intercostal spaces (between ribs) as acoustic windows, and why phased array probes have small footprints.