Sterile technique is the foundation of safe clinical practice, preventing infections by eliminating all microorganisms from the procedural field. Mastering the principles, mastering preparation steps, and recognizing common mistakes will protect both patients and healthcare workers. This article breaks down each phase with clear, actionable guidance for students, including real-world examples and an easy-to-reference troubleshooting table.
What Is Sterile Technique and Why It Matters
Sterile technique refers to a set of practices used to maintain a completely microorganism-free environment during invasive procedures. Unlike clean technique, which reduces the number of pathogens, sterile technique aims for zero contamination. Every student must understand that even a single break in this process can lead to surgical site infections, catheter-related bloodstream infections, or other serious complications.
Core Principles of Sterile Technique
These principles are non‑negotiable in any sterile field setup. Violating any one of them compromises patient safety.
- Only sterile items contact the sterile field. Any object that touches a non‑sterile surface is immediately contaminated.
- Sterile barriers must remain intact. Gowns, drapes, and gloves must be free of tears, punctures, or moisture wicking.
- Maintain a safe margin. A one‑inch (2.5 cm) border around the sterile field is considered contaminated. Keep non‑sterile items outside this zone.
- Face the sterile field at all times. Turning your back, even briefly, exposes the field to airborne contaminants and is a breach.
- Keep sterile items above waist level. Anything held below waist height is considered contaminated because it may have brushed against unsterile surfaces.
- Minimize traffic and talking. Movement and speech increase airborne particle shedding. Procedures should be performed in a quiet area with controlled access.
Preparation: Setting Up for Success
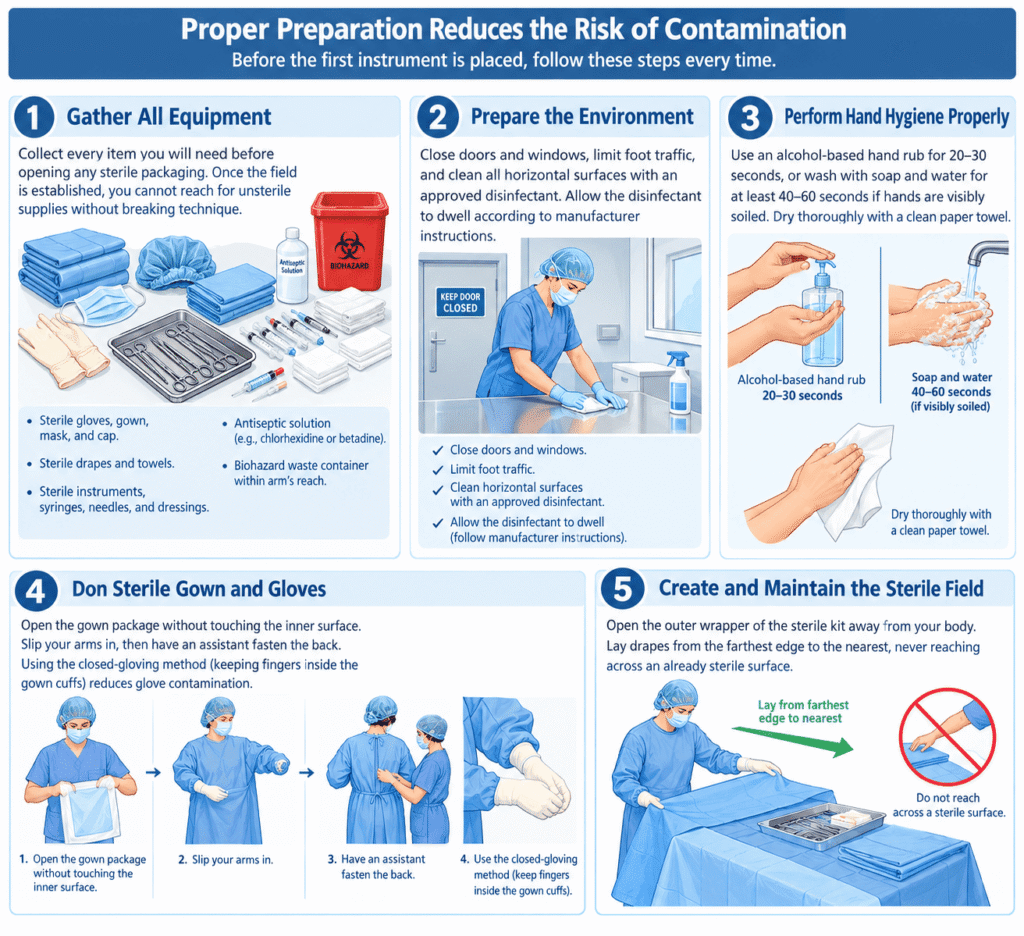
Proper preparation reduces the risk of contamination before the first instrument is placed. Follow these steps every time.
Step 1: Gather All Equipment
Collect every item you will need before opening any sterile packaging. Once the field is established, you cannot reach for unsterile supplies without breaking technique.
- Sterile gloves, gown, mask, and cap.
- Sterile drapes and towels.
- Sterile instruments, syringes, needles, and dressings.
- Antiseptic solution (e.g., chlorhexidine or betadine).
- Biohazard waste container within arm’s reach.
Step 2: Prepare the Environment
Close doors and windows, limit foot traffic, and clean all horizontal surfaces with an approved disinfectant. Allow the disinfectant to dwell according to manufacturer instructions.
Step 3: Perform Hand Hygiene Properly
Use an alcohol‑based hand rub for 20–30 seconds, or wash with soap and water for at least 40–60 seconds if hands are visibly soiled. Dry thoroughly with a clean paper towel.
Step 4: Don Sterile Gown and Gloves
Open the gown package without touching the inner surface. Slip your arms in, then have an assistant fasten the back. Using the closed‑gloving method (keeping fingers inside the gown cuffs) reduces glove contamination.
Step 5: Create and Maintain the Sterile Field
Open the outer wrapper of the sterile kit away from your body. Lay drapes from the farthest edge to the nearest, never reaching across an already sterile surface.
Common Mistakes Students Make
Even with perfect theory, practical errors occur. Recognizing these pitfalls helps you avoid them.
- Reaching across the sterile field. This contaminates the draped area with non‑sterile clothing or skin. Always approach from the side.
- Splashing antiseptic onto the field. Pour solutions slowly and into a sterile basin, not directly onto the field.
- Allowing sterile packages to touch non‑sterile surfaces. After opening a peel pack, place the item so that only the sterile inner contents contact the field.
- Moisture wicking. Liquid soaking through a drape or gown creates a pathway for microbes. Replace any wet barrier immediately.
- Improper glove removal. Touch only the outside of one glove to pull it off, then slip fingers under the other glove’s cuff. Never touch bare skin to the glove exterior.
- Forgetting to check expiration dates. Sterile items beyond their expiration date are not guaranteed sterile. Inspect every package.
Practical Example: Central Line Dressing Change
Imagine you are performing a sterile dressing change on a central venous catheter. You set up your field, don gloves, and then realize you forgot the antiseptic swabs. Without thinking, you pivot to grab a bottle from an unsterile table. This simple pivot brings your gloved hand within the one‑inch border—contaminating the edge of the field. The correct action would be to stop, remove your gloves, collect the missing item, and re‑sterilize your hands and gloves before continuing. Small lapses like this are the most common cause of catheter‑related infections.
Table: Quick Troubleshooting Guide for Sterile Technique
| Problem | Immediate Action | Preventive Tip |
|---|---|---|
| Glove tear during procedure | Remove both gloves, perform hand hygiene, don new sterile gloves | Check glove size weekly; double‑glove for high‑risk procedures |
| Drape becomes wet | Cover wet area with a sterile towel or replace the drape | Keep fluids away from field edge; use waterproof drapes |
| Instrument drops on the floor | Leave it; do not attempt to reuse. Obtain a new sterile instrument | Arrange tray to avoid reaching over table edge |
| Sneeze or cough near field | Stop procedure, mask properly, clean field with sterile wipe if splatter occurred | Always wear mask; turn head away from field |
| Unsterile person touches field | Remove contaminated items, re‑drape, re‑glove | Verbally warn untrained staff before starting |
Two Essential Quotations from Clinical Practice
“The moment you suspect a break in sterile technique, it is a break. Do not rationalize—re‑establish the field. Your patient’s bloodstream does not negotiate.”
“In the operating room, sterile technique is not a rule to be memorized; it is a habit that must be trained until it becomes reflex. Every student has the power to protect every patient.”
How to Practice Sterile Technique Outside the Lab
You can simulate sterile awareness at home using packaged supplies. Practice opening a peel pack without touching the inner contents, donning gloves by only touching the cuffs, and arranging a “sterile field” made of a clean towel. Record yourself and review for common mistakes like moving your hand below waist level.
Another tip: During clinical rotations, ask a preceptor to observe your setup and provide direct feedback. Most experienced nurses or surgeons are happy to coach students who show sincere effort.
Conclusion
Sterile technique is not optional—it is a patient safety imperative. By internalizing the core principles, preparing methodically, and learning from frequent errors, you build competence that lasts a lifetime. Every small action, from hand hygiene to field management, contributes to infection prevention. Stay vigilant, stay honest when mistakes happen, and always prioritize the patient’s well‑being over speed or convenience.
Frequently Asked Questions (FAQ)
1. What is the difference between sterile technique and clean technique?
Sterile technique aims for a completely microorganism‑free environment using sterile supplies and barriers. Clean technique reduces microbial load but does not eliminate it. Sterile technique is mandatory for invasive procedures such as catheter insertions, surgeries, and central line care; clean technique is appropriate for non‑invasive tasks like routine vital sign measurement.
2. How long can a sterile field remain open before it must be discarded?
A sterile field should be prepared immediately before use. There is no universally safe “open time” because airborne contamination increases with duration. Most clinical guidelines recommend discarding the field if it has been exposed to room air for more than one hour, especially if there is any traffic or air movement.
3. Can I reuse a sterile glove if it touches only a sterile surface?
No. Once a glove is donned, it is considered sterile only on the external surface. If the glove touches another sterile item, it remains sterile only on that single contact point—but the risk of unnoticed contamination is too high. In practice, you must never reuse gloves; remove and replace with a fresh pair.
4. What should I do if I accidentally touch the sterile field with my bare hand?
Stop immediately. Remove any items that may have been contaminated, discard the entire sterile field, perform hand hygiene, and set up a new field. Even a brief touch can transfer thousands of bacteria. Patient safety overrides the cost or time lost.
5. Is it okay to talk while maintaining a sterile field?
Talking should be minimized. Every word releases droplets that can settle on the field. If conversation is necessary, keep it brief and speak with the mask fully covering your nose and mouth. Avoid laughter, coughing, or sneezing near the area.
6. Why do we keep sterile items above waist level?
Waist height is a standard safety benchmark. Below waist level, items can easily brush against unsterile surfaces like the user’s legs, the floor, or a nearby table. This rule also prevents accidental drops and helps maintain a consistent visual boundary.
7. How do I properly open a sterile package without contaminating the contents?
Hold the package so that the top flap faces away from your body. Gently peel open the sides, letting the flaps fall back. Grasp the inner wrapper’s corners from the outside, then shake or drop the item onto the sterile field without touching the inner surface. Never touch the inside of the peel pack.
8. What is the most common mistake students make with sterile drapes?
Students often place the drape from the nearest edge to the farthest, causing their arm to cross over the already sterile area. The correct method is to place the far edge first and roll or unfold the drape toward yourself. This keeps your non‑sterile arm from passing above the field.
9. Can moisture compromise a sterile barrier?
Yes. Moisture allows microorganisms to wick through fabric or paper barriers, even if the material appears intact. Any drape or gown that becomes wet must be replaced immediately. This is particularly important during lengthy procedures where perspiration or irrigation fluid can accumulate.
10. Do I need to change sterile gloves between procedures on the same patient?
Yes, if you move from a contaminated site (e.g., a wound dressing) to a sterile site (e.g., inserting a urinary catheter), you must perform hand hygiene and don new sterile gloves. Even within the same patient, different body sites have different microbial flora, and cross‑contamination can occur.