After an injury, regaining strength and motion is only half the battle. Your balance may feel shaky, uncertain, or even frightening — and that is completely normal. Balance exercises after injury are a vital part of rebuilding your body’s stability and preventing future problems. This guide explains why balance matters, how to progress safely, and exactly which exercises to use as you move through each stage of recovery.
Why Balance Matters After Injury
When you injure a joint, ligament, or muscle, your bodyu2019s proprioception — the internal sense that tells your brain where your body is in space — is disrupted. This is why your ankle can feel unsteady after a sprain, or why your knee may give way even after it has healed. Balance exercises after injury retrain this system, restoring the connection between your muscles, joints, and brain.
Key benefits of consistent balance training include:
- Improved joint stability and alignment
- Better coordination and reaction time
- Reduced fear of movement and re-injury
- Lower risk of falls during daily activities
- Faster, more confident return to sport or work
Before You Start: Safety First
Balance training is powerful, but doing too much too soon can set your recovery back. Always get clearance from your physical therapist or doctor before beginning a new exercise routine, especially if your injury is recent or severe.
Follow these safety guidelines every time you train:
- Start on a stable, flat surface with room to move
- Keep a chair, counter, or wall within armu2019s reach
- Wear supportive shoes unless your therapist recommends barefoot work
- Stop immediately if you feel sharp pain, swelling, or dizziness
- Do not close your eyes unless your therapist explicitly instructs you to
- Progress one variable at a time — do not add difficulty on multiple fronts at once
You donu2019t need to master every exercise at once. Balance is rebuilt one small step — and one small wobble — at a time.
Phase 1: Restoring Basic Balance
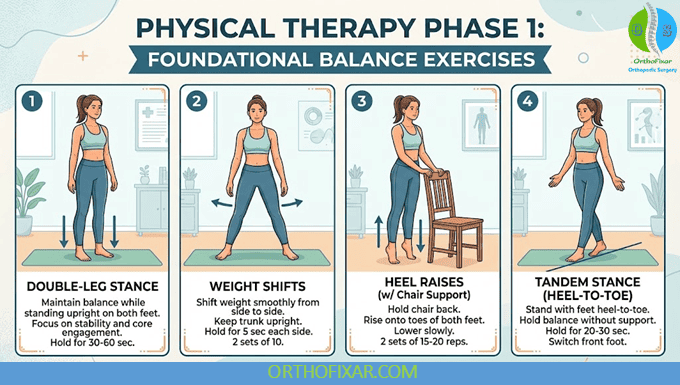
In the earliest stage of recovery, your goal is simple: re-establish a steady, confident stance. These foundational balance exercises after injury are low-impact and appropriate for most patients, including those still using crutches, braces, or light support.
Phase 1 exercises:
- Double-leg stance: Stand with feet hip-width apart. Hold for 30 to 60 seconds. Keep your hands on a chair if needed.
- Weight shifts: Gently shift your weight from one foot to the other without lifting either foot. Move slowly and rhythmically for 30 to 60 seconds.
- Heel raises: Hold onto a stable surface, rise onto your toes, and lower back down in a slow, controlled motion. Do 10 to 15 repetitions.
- Tandem stance: Stand with one foot directly in front of the other, heel to toe. Hold for 20 to 30 seconds per side, using support as needed.
Perform 2 to 3 sets of each exercise, once or twice a day. Stop if you feel any sharp or unusual pain.
Phase 2: Building Strength Through Movement
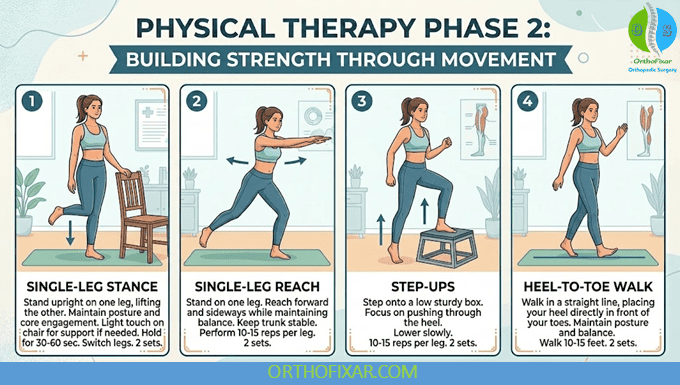
Once you can hold a basic stance without excessive wobbling, it is time to add movement. This phase challenges your balance while engaging the muscles around the injured joint, which helps with both stability and confidence.
Phase 2 exercises:
- Single-leg stance: Stand on the injured leg with a light touch on a stable surface. Work up to holding for 20 to 30 seconds.
- Single-leg reach: Standing on the injured leg, slowly reach forward, sideways, or backward with the opposite hand. Repeat 8 to 10 times per direction.
- Step-ups: Step onto a low step or sturdy box, then step back down slowly. Keep your movements controlled and your knee aligned with your toes.
- Heel-to-toe walk: Walk in a straight line, placing your heel directly in front of your toes with each step. Use a wall for support if needed. Do 10 to 15 steps.
The table below summarizes a safe progression through the phases.
| Phase | Exercise | Sets × Duration | Suggested Support | Goal |
|---|---|---|---|---|
| Phase 1 | Double-leg stance | 2–3 × 30–60 sec | Hold onto chair | Steady, confident stance |
| Phase 1 | Weight shifts | 2–3 × 30–60 sec | Light touch on surface | Controlled weight transfer |
| Phase 2 | Single-leg stance | 2–3 × 20–30 sec | One-finger support | Reduced wobble on injured leg |
| Phase 2 | Heel-to-toe walk | 3 × 10–15 steps | Wall nearby | Smooth, straight-line gait |
| Phase 3 | Single-leg throw and catch | 3 × 10 reps | None | Stability under distraction |
| Phase 3 | Foam surface stance | 2–3 × 30 sec | Spotter or rail | Adapt to unstable surfaces |
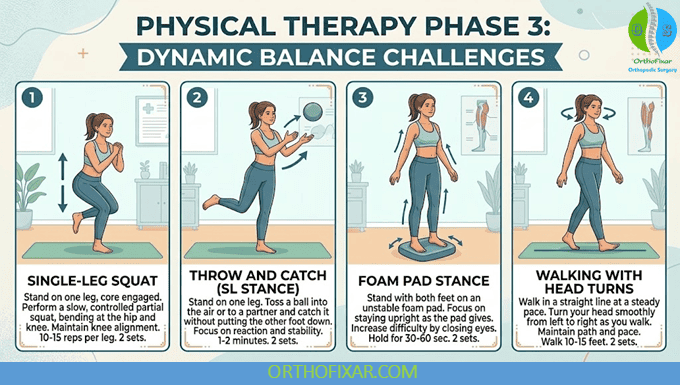
Phase 3: Dynamic Balance Challenges
This advanced phase is for patients who are close to returning to sport, heavy physical work, or demanding daily activities. Balance exercises after injury at this stage mimic real-life movements: quick reactions, uneven surfaces, and divided attention.
Phase 3 exercises:
- Single-leg squat: Stand on the injured leg and perform a slow, partial squat. Keep your knee tracking over your toes. Do 8 to 12 repetitions.
- Throw and catch: Stand on one leg while a partner tosses a soft ball toward you. Catch and return the ball without losing your stance. Do 10 to 20 throws.
- Foam pad or cushion stance: Stand on a firm foam pad, first on both feet and then on one foot. Keep a spotter or rail close by.
- Walking with head turns: Walk in a straight line while slowly turning your head left and right. This challenges your vestibular system and improves dynamic stability.
- Single-leg balance with eyes closed: Attempt this only if your physical therapist clears you for it. It is an advanced progression and not a starting point.
When you wobble, you learn. That wobble is your bodyu2019s way of adjusting, adapting, and getting stronger.
How Often Should You Train Balance?
Consistency matters far more than intensity when it comes to balance training. Short daily sessions are more effective than longer, infrequent workouts. Most patients benefit from 5 to 10 minutes of focused balance work per session.
Suggested frequency by phase:
- Phase 1: Once or twice daily, 5 to 10 minutes per session
- Phase 2: Once daily, integrated into your regular rehabilitation routine
- Phase 3: 3 to 4 times per week, combined with strength and conditioning work
Give yourself rest days when needed. Balance training is more tiring than it looks — your nervous system is working hard even when your muscles are not.
Listening to Your Body: Signs of Progress Versus Overdoing It
Not all discomfort during balance training is a problem, but it is important to distinguish between normal muscle fatigue and a true setback. Being honest with yourself will help you progress safely.
Signs it is time to progress to the next phase:
- You can hold each exercise without support for a full minute
- There is no pain or swelling the day after training
- You feel stable even when distracted or moving your head
- You no longer need to look at your feet to maintain balance
Signs you should scale back or take a rest day:
- Sharp or shooting pain in the injured area
- Increased swelling or warmth around the joint
- A feeling that the joint is giving way during simple tasks
- Dizziness, light-headedness, or blurred vision
If any of these red flags appear, reduce the difficulty, use more support, and consult your therapist before continuing.
Balance exercises after injury are not optional — they are essential to a complete and lasting recovery. By moving through these phases at your own pace, you allow your body to re-learn the stability it lost. Start where you are, respect your limits, and trust that steady, consistent practice will bring you back to confident movement.