Venipuncture is a core clinical skill every medical student must master. This guide covers the essential equipment, step-by-step technique, and critical safety measures needed to perform venipuncture confidently and competently in a clinical setting. From choosing the right needle to preventing complications, the following information is designed to help students build a solid foundation for this routine but vital procedure.
Essential Equipment for Venipuncture
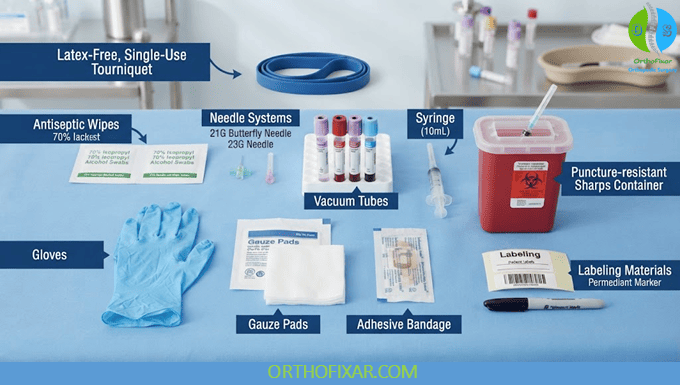
- Tourniquet – A latex-free, single-use tourniquet applied 3–4 inches above the puncture site to engorge the vein.
- Antiseptic wipes – 70% isopropyl alcohol or chlorhexidine swabs for skin disinfection.
- Needles – Typically 21G to 23G butterfly needles or straight needles. Choose the smallest gauge that allows adequate blood flow to minimize trauma.
- Vacuum tubes or syringes – Sterile collection tubes (e.g., EDTA, serum separator) or a syringe for manual draw. Ensure correct order of draw.
- Gloves – Powder-free, non‑sterile examination gloves. Always wear gloves for standard precautions.
- Gauze pads and adhesive bandage – For applying pressure after needle removal and covering the site.
- Sharps container – A puncture‑resistant container for immediate disposal of used needles.
- Labeling materials – Patient labels or permanent markers to document the sample immediately.
| Needle Gauge | Typical Use | Patient Considerations |
|---|---|---|
| 21G (green) | Standard adult venipuncture | Good flow rate; suitable for most veins |
| 22G (black) | Small or fragile veins | Less traumatic; slower draw |
| 23G (blue) | Pediatric or elderly patients | Minimal pain; may cause hemolysis if pulled too fast |
| Butterfly (winged) 23G | Difficult veins or hard‑to‑stick areas | Flexible tubing; helps with hand veins |
Step-by-Step Venipuncture Procedure
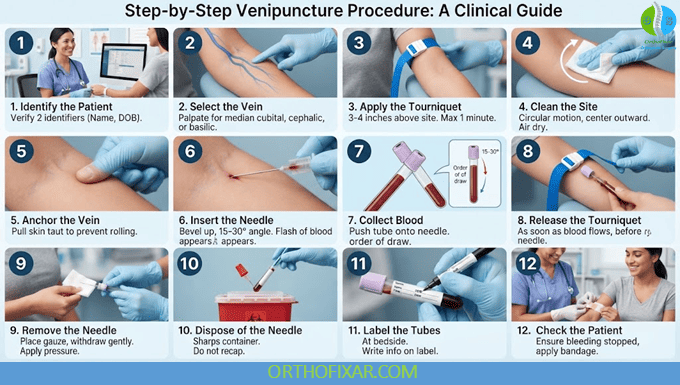
- Identify the patient – Verify using two identifiers (name and date of birth). Confirm the ordered tests and required tubes.
- Select the vein – Palpate the antecubital fossa (median cubital, cephalic, or basilic vein). Avoid areas with bruising, scarring, or an IV line.
- Apply the tourniquet – Place it 3–4 inches above the site. Do not leave it on longer than one minute to avoid hemoconcentration.
- Clean the site – Use an alcohol wipe in a circular motion from center outward. Allow it to air dry completely (about 30 seconds). Do not repalpate after cleaning.
- Anchor the vein – Use your thumb to pull the skin taut below the intended puncture site. This prevents the vein from rolling.
- Insert the needle – Hold the needle bevel up at a 15–30 degree angle. Advance smoothly until a flash of blood appears in the hub.
- Collect the blood – For vacuum tubes, push the tube into the holder until the needle punctures the stopper. Fill tubes in the correct order (blood culture first, then citrate, serum, heparin, EDTA, and finally fluoride).
- Release the tourniquet – Do this as soon as blood starts flowing, but before removing the needle.
- Remove the needle – Place a gauze pad over the site and withdraw the needle gently. Apply firm pressure for 2–3 minutes (or longer if the patient is on anticoagulants).
- Dispose of the needle – Immediately discard the entire needle‑holder assembly into a sharps container without recapping.
- Label the tubes – Write the patient’s name, date, and time on each tube at the bedside. Do not pre‑label.
- Check the patient – Ensure bleeding has stopped, apply an adhesive bandage, and thank the patient.
“Always anchor the vein with the thumb of your non‑dominant hand. This simple technique prevents the most common cause of failed venipuncture: a rolling vein.”
Safety Precautions During Venipuncture
- Hand hygiene – Wash hands with soap and water or use an alcohol‑based hand rub before and after glove use.
- Personal protective equipment (PPE) – Wear gloves and a face shield if there is a risk of splash. Change gloves between patients.
- Needlestick prevention – Never recap a used needle. Activate any safety mechanism immediately after withdrawal. Dispose of sharps at the point of use.
- Site selection – Do not use an arm with an arteriovenous fistula, mastectomy side, or an active infection. Avoid extensive scarring or burns.
- Patient assessment – Ask about allergies (especially to latex or antiseptics), bleeding disorders, or a history of fainting. Have the patient lie down if they are prone to syncope.
- Infection control – Use a clean gauze pad to apply pressure, not your finger. If blood spills, clean immediately with a 1:10 bleach solution or an approved disinfectant.
- Proper labeling – Label tubes at the bedside to prevent misidentification. Never leave a labeled tube unattended.
“The single most effective way to prevent a needlestick injury is to activate the safety feature the moment the needle is withdrawn. Do not wait until after disposal.”
Common Complications and How to Avoid Them
- Hematoma – Caused by the needle puncturing the back wall of the vein or insufficient pressure after removal. To avoid: remove the needle before releasing the tourniquet, and apply firm pressure for at least two minutes.
- Hemolysis – Often due to a small‑gauge needle, excessive pulling on a syringe, or vigorous shaking of tubes. Use a 21G or larger needle where possible and gently invert tubes.
- Fainting (vasovagal syncope) – Watch for pallor, sweating, or dizziness. Keep the patient supine, lower the head, and offer cool water. Do not attempt to catch a falling patient; lower them to the floor safely.
- Infection – Rare but serious. Always use sterile technique, allow antiseptic to dry, and do not touch the puncture site after cleaning.
- Nerve injury – Avoid deep probing or lateral movements of the needle. If the patient reports shooting pain or numbness, withdraw the needle immediately and choose another site.
- Incorrect tube order – Leads to cross‑contamination of additives. Memorize the standard order: blood culture, citrate, serum, heparin, EDTA, fluoride.
Tips for Success as a Medical Student
- Practice on a simulation arm or with a classmate using a butterfly needle until your technique feels smooth.
- Always palpate the vein rather than relying on sight; many veins are not visible but are palpable.
- If you miss the vein on the first attempt, do not redirect the needle inside the arm. Withdraw completely and attempt again with a fresh needle.
- Keep the patient informed. Explain each step and ask them to keep still. A relaxed patient has less vasoconstriction.
- After the procedure, document the number of attempts, site used, and any complications in the patient chart.
Mastering venipuncture requires practice, patience, and a strong commitment to safety. By following the equipment guidelines, step‑by‑step procedure, and safety protocols outlined here, medical students can perform venipuncture with minimal discomfort to the patient and reduce the risk of complications. Always remember that every interaction is a chance to build trust and refine your clinical skills.
Frequently Asked Questions (FAQ)
What is venipuncture?
Venipuncture is the process of puncturing a vein with a needle to collect blood for diagnostic testing, transfusion, or monitoring. It is one of the most common procedures in healthcare.
Which veins are best for venipuncture?
The antecubital veins (median cubital, cephalic, and basilic) are preferred because they are large, superficial, and relatively immobile. In difficult cases, hand veins or forearm veins may be used.
What size needle should I use for a standard adult?
A 21G needle (green hub) is standard for most adults. For smaller veins or pediatric patients, use a 22G or 23G butterfly needle.
How do I prevent a hematoma?
Release the tourniquet before removing the needle, apply firm pressure with gauze for at least two minutes, and avoid bending the arm excessively after the draw.
What is the correct order of draw for vacuum tubes?
The recommended order is: blood culture bottles, citrate tube (light blue), serum tube (plain or with clot activator), heparin tube (green), EDTA tube (lavender), and fluoride tube (gray).
Can I use the same vein for multiple attempts?
No. If you miss the vein, remove the needle and apply pressure. Do not attempt another stick in the same vein. Choose a different site or the opposite arm.
How long should I leave the tourniquet on?
No longer than one minute. Prolonged tourniquet application can cause hemoconcentration, altered lab values, and patient discomfort.
What should I do if a patient faints during venipuncture?
Remove the needle immediately, apply pressure, and lower the patient’s head below the level of the heart. Monitor their breathing and pulse. Call for help if they do not recover quickly.
Do I need to wear gloves every time?
Yes. Gloves are required for standard precautions to protect both you and the patient from bloodborne pathogens. Change gloves between each patient.
How can I improve my venipuncture success rate?
Practice with a simulation arm, use proper vein anchoring, choose an appropriate needle size, and remain calm. Shadow an experienced phlebotomist to learn tips for difficult patients.