
Chest X-ray interpretation is one of the most common and useful skills for medical students, but it can also feel intimidating. The secret to confident reading is not an extraordinary eye, but a consistent step-by-step system that checks every major structure every time. This article gives you a clear, practical framework for chest X-ray interpretation that you can apply immediately in examinations, ward rounds, and real clinical practice.
Why a Systematic Approach Matters
When you read a chest X-ray randomly, you tend to notice the most obvious abnormality and miss everything else. A structured method prevents this anchoring trap and keeps your reports organised. It also makes your thought process visible to senior clinicians and examiners, which is a major advantage in teaching settings.
- Reduce the risk of missing subtle findings such as small effusions or apical masses.
- Build a reusable mental checklist that works for every patient.
- Improve your documentation with logically reported observations.
- Speed up your workflow once the pattern becomes automatic.
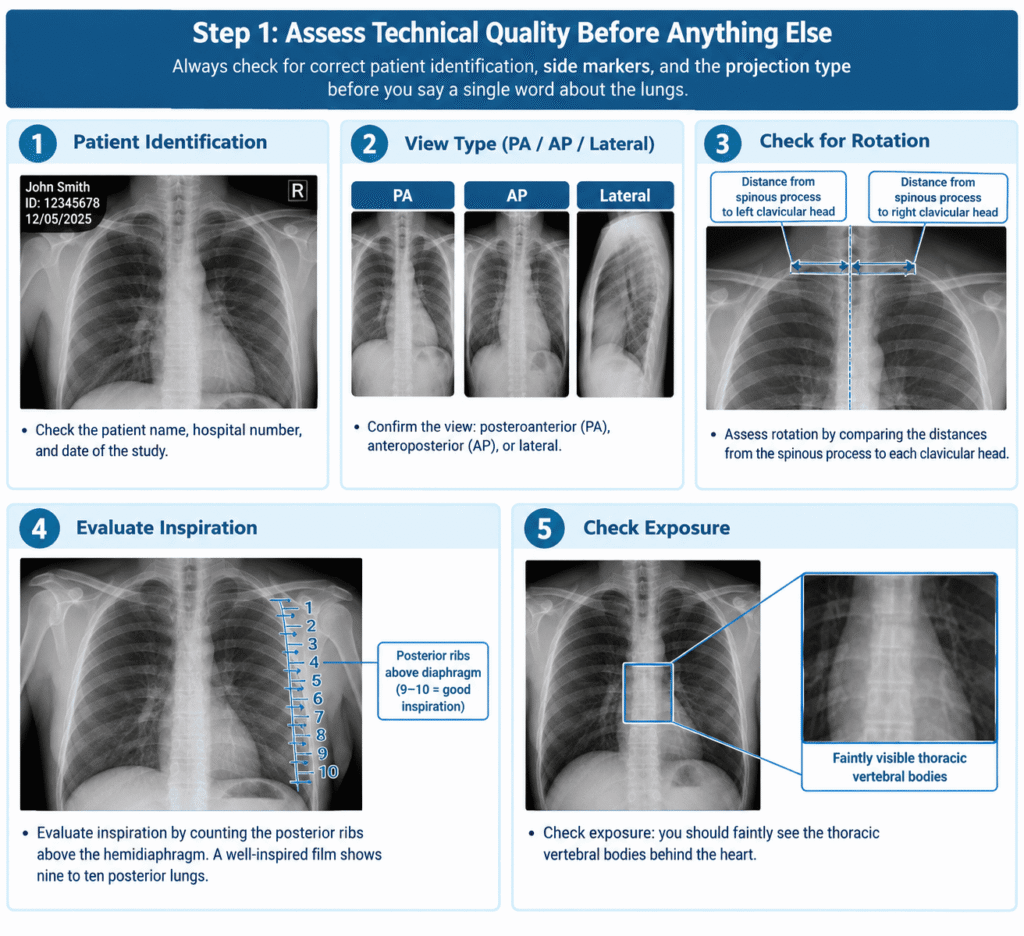
Step 1: Assess Technical Quality Before Anything Else
Look at the radiograph before you interpret it. A poor-quality chest X-ray can mimic disease or hide it completely. Always check for correct patient identification, side markers, and the projection type before you say a single word about the lungs.
- Check the patient name, hospital number, and date of the study.
- Confirm the view: posteroanterior (PA), anteroposterior (AP), or lateral.
- Assess rotation by comparing the distances from the spinous process to each clavicular head.
- Evaluate inspiration by counting the posterior ribs above the hemidiaphragm. A well-inspired film shows nine to ten posterior lungs.
- Check exposure: you should faintly see the thoracic vertebral bodies behind the heart.
For example, an AP film from a portable machine often makes the heart look larger than it truly is. If you ignore the technique, you may call cardiomegaly that is not present.
Step 2: Examine the Heart and Mediastinum
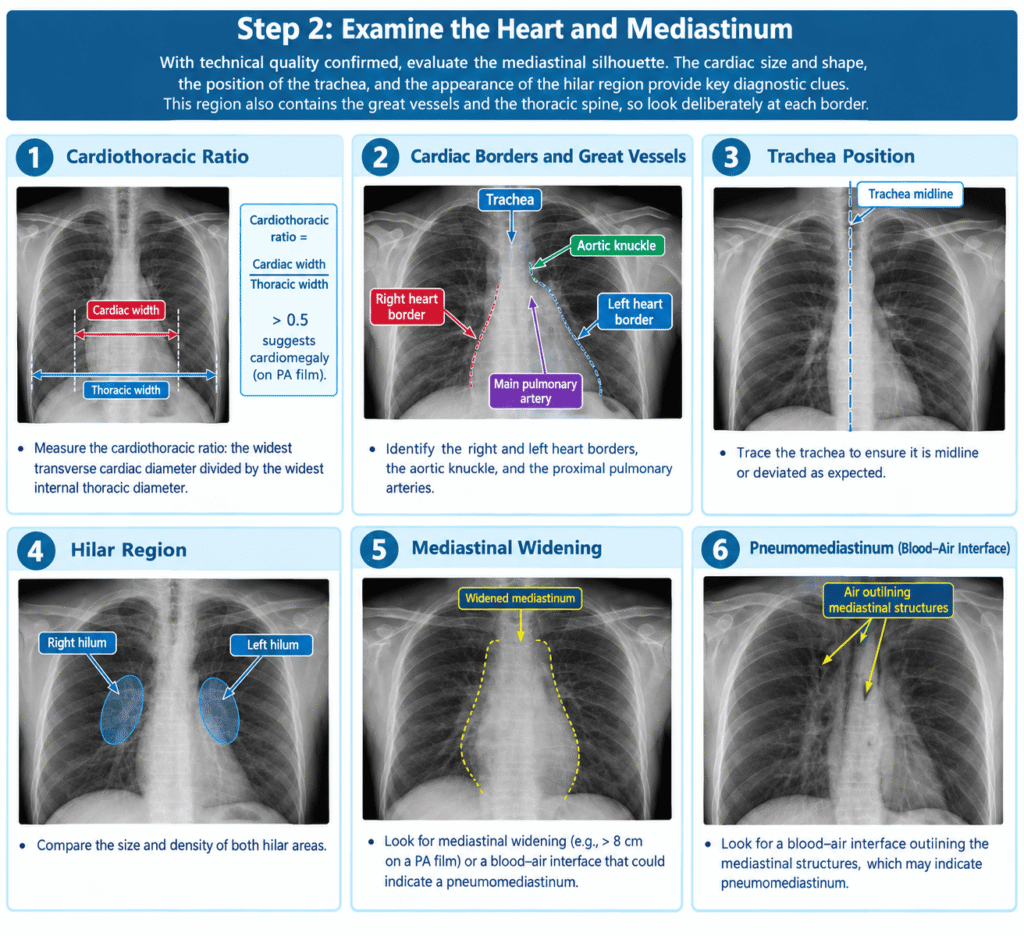
With technical quality confirmed, evaluate the mediastinal silhouette. The cardiac size and shape, the position of the trachea, and the appearance of the hilar region provide key diagnostic clues. This region also contains the great vessels and the thoracic spine, so look deliberately at each border.
- Measure the cardiothoracic ratio: the widest transverse cardiac diameter divided by the widest internal thoracic diameter. A ratio above 0.5 suggests cardiomegaly on a PA film.
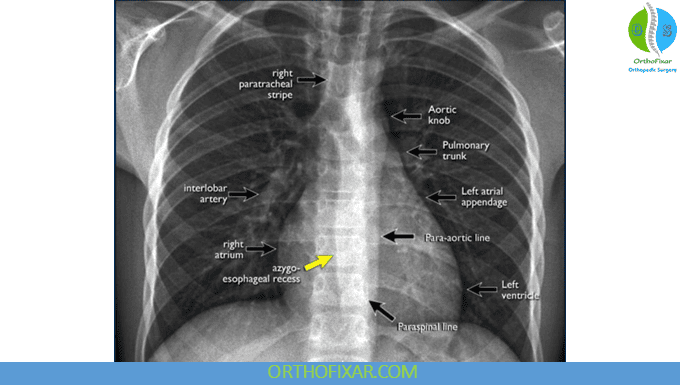
- Identify the right and left heart borders, the aortic knuckle, and the proximal pulmonary arteries.
- Trace the trachea to ensure it is midline or deviated as expected.
- Compare the size and density of both hilar areas.
- Look for mediastinal widening or a blood–air interface that could indicate a pneumomediastinum.
“You will not find what you do not look for. A systematic reader always checks the mediastinum before moving to the lungs.”
Step 3: Review the Lungs and Pleura
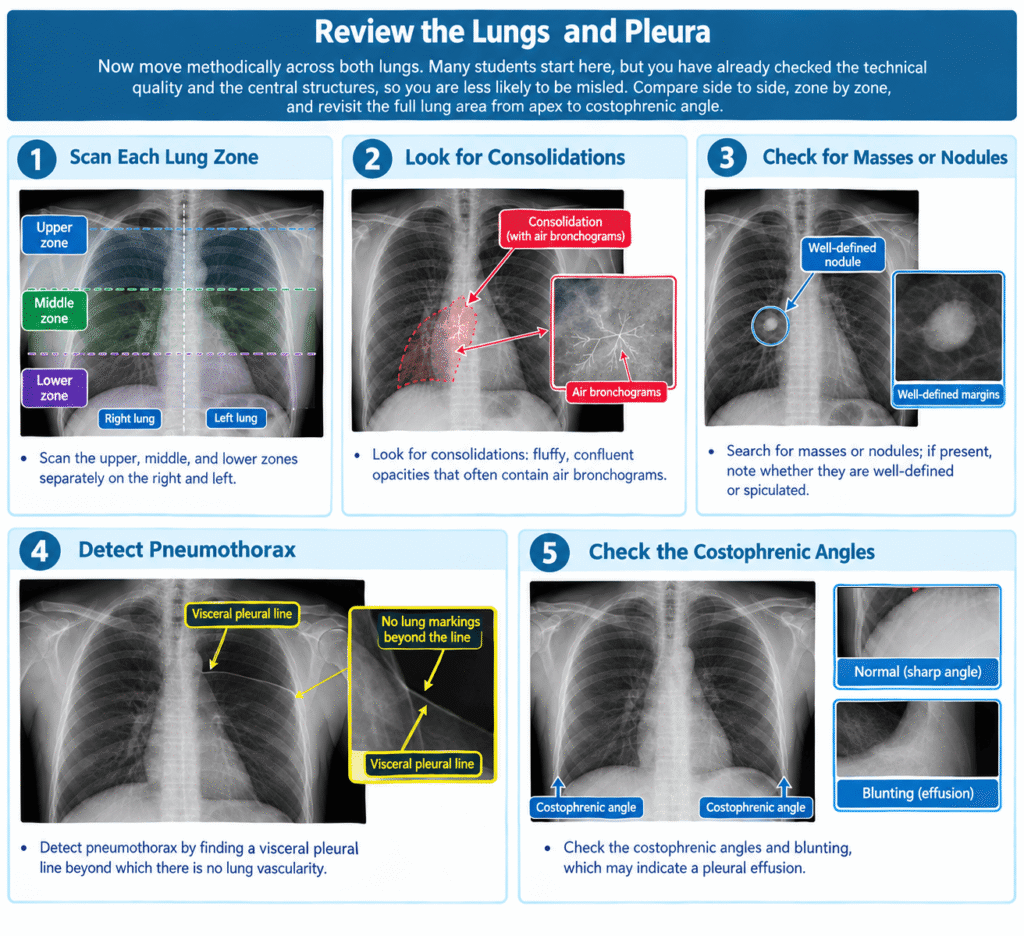
Now move methodically across both lungs. Many students start here, but you have already checked the technical quality and the central structures, so you are less likely to be misled. Compare side to side, zone by zone, and revisit the full lung area from apex to costophrenic angle.
- Scan the upper, middle, and lower zones separately on the right and left.
- Look for consolidations: fluffy, confluent opacities that often contain air bronchograms.
- Search for masses or nodules; if present, note whether they are well-defined or spiculated.
- Detect pneumothorax by finding a visceral pleural line beyond which there is no lung vascularity.
- Check the costophrenic angles and blunting, which may indicate a pleural effusion.
In a patient with breathlessness, an opacified hemithorax could represent a massive effusion, total lung collapse, or prior pneumonectomy. Your systematic approach forces you to check the tracheal shift, which helps differentiate these conditions: the trachea shifts away from an effusion and toward a collapse.
Step 4: Assess Bones, Soft Tissues, and Hidden Areas
Many teaching films intentionally hide findings in the bone edges or behind the heart. Create the habit of looking at the thoracic cage and the soft tissues separately. This step also catches metastatic rib lesions, clavicular fractures, and unsuspected causes of shoulder pain.
- Inspect every visible rib, from the posterior costovertebral joints to the anterior cartilages.
- Trace both clavicles and the scapulae where they project over the lung fields.
- Look at the thoracic spine and the acromioclavicular joints if included.
- Check the soft tissue silhouette for surgical emphysema or breast shadows.
- Do not forget the “hidden” areas: the lung apices, the retrocardiac region, and below the diaphragmatic domes.
A Practical Student Example: Putting It All Together
Take a common scenario: a 68-year-old woman with worsening shortness of breath and a history of heart failure. You receive a chest X-ray and immediately apply this systematic method.
- Technical quality: The image is an erect PA film, well-inspired and non-rotated. You can proceed confidently.
- Heart and mediastinum: The cardiothoracic ratio is around 0.62. The aortic knuckle looks normal, but there is bilateral hilar congestion.
- Lungs and pleura: Both lower zones show hazy opacities with indistinct vessels, more marked on the right. The costophrenic angles are blunted bilaterally, suggesting small effusions.
- Bones and soft tissues: No acute fractures are visible. The soft tissues show no subcutaneous air.
This structured reading takes less than two minutes. In your report, you can confidently state that the findings are typical of pulmonary oedema with small bilateral pleural effusions, and then recommend clinical correlation.
Memory Aids and Final Checks
Memory aids help you stay disciplined during pressure situations. One simple approach is to remember A–T–C–H: Airway, Trachea, Cardiac, Hilar/Hemidiaphragms, then call it done after checking the bones. Another popular mnemonic for the whole film is “I’m Really Tired, Let’s Go Home”, representing Inspiration, Rotation, Technique, Lungs, Cardiac, Hemidiaphragms, and Hidden areas.
“In a busy on-call, your checklist becomes your companion. A tired student who follows a checklist still outperforms a fresh student who relies on memory.”
At the end of every film, zoom out and look at the entire image again. This final quick sweep often catches a peripheral pneumothorax or an unexpected foreign object that you missed during your careful passes.
| System step | Key question | Abnormal finding to describe |
|---|---|---|
| Technical quality | Is the film diagnostic? | Poor inspiration, rotation, or exposure |
| Heart and mediastinum | Is the cardiomediastinal silhouette normal? | Cardiomegaly, mediastinal shift, hilum asymmetry |
| Lungs and pleura | Are the lung zones clear and comparable? | Consolidation, nodule, pneumothorax, effusion |
| Bones and soft tissue | Are the chest wall structures intact? | Rib fracture, lytic lesion, subcutaneous emphysema |
Systematic chest X-ray interpretation is a skill you build through regular practice. Use this framework every time you read a film, whether you are in a lecture hall or in front of a bright screen at a night shift. Over time, you will naturally notice the midline shift, the lost heart border, or the tiny pleural line without hunting for them.
Frequently Asked Questions
What is the most important technique for a chest X-ray beginner?
Always check technical quality first. Look for the patient name, side marker, rotation, inspiration, and penetration. Forgetting this simple step is the most common reason for misinterpreting normal films as abnormal.
How do I know if a chest X-ray is well inspired?
A well-inspired PA chest X-ray demonstrates at least nine posterior ribs above the right hemidiaphragm, and often ten. If you see eight or fewer, the lungs may appear more congested or more opaque than they actually are.
What does an under-penetrated chest X-ray look like?
The vertebral bodies disappear behind the heart, and the lung markings appear denser than normal. On these films, subtle pulmonary nodules may be masked, while the heart may look falsely enlarged.
Why does an AP film make the heart look bigger?
Because the heart is further from the detector in an anteroposterior projection, magnification occurs. Therefore, always state the projection type in your report and avoid calling the heart enlarged on an AP film unless the diameter is very obviously increased.
When is a lung nodule considered suspicious?
Findings such as irregular margins, spiculation, growth on previous films, or a nodule larger than eight millimetres warrant suspicion. Always compare with old chest X-rays whenever they are available, because stability over time is reassuring.
How can I identify a pneumothorax on a chest X-ray?
Look for the visceral pleural line, which is a thin white line that runs parallel inside the chest wall. Beyond this line, you will see no lung vascular markings. Type, size, and presence of tension signs should guide your next step.
What is a costophrenic angle blunting?
It means the normal sharp angle between the diaphragm and the chest wall is lost. The most common cause is a small pleural effusion. When you see blunting, also check for a meniscus sign, which confirms fluid rather than scarring or a previous lung resection.
Should I read a chest X-ray with an artificial intelligence tool?
Current artificial intelligence systems are powerful for flagging findings like nodules or large effusions, but they do not replace your systematic reading. Use AI as an extra second reader, and always remember that you are responsible for the final interpretation.
What does air bronchogram mean on a chest X-ray?
An air bronchogram appears when gas-filled bronchi are visible through an area of opaque lung parenchyma. This finding usually indicates a consolidation, such as pneumonia, where the alveoli are filled with fluid or pus but the conducting airways still contain air.
Why do I need to review the “hidden areas” on every chest X-ray?
The lung apices, retrocardiac regions, and the costophrenic angles are easy to overlook because they lie behind or between dense structures. Lung cancers and small pneumothoraces often hide in these zones, particularly on portable films. Make hidden areas a final, deliberate step in every interpretation.